Deburring is the process of removing small, unwanted sharp edges or protrusions (burrs) left on a part after machining, cutting, drilling, or stamping through a deburring process. Burrs form when material is deformed or torn instead of sheared cleanly; for example, when a tool exits the workpiece, it can push material over the edge, creating a rollover burr. Similarly, if the material tears rather than cuts, a tear burr forms, or if the cut is incomplete, a cutoff burr (also called breakout burr) remains. Even plastic parts can have burrs after injection molding or machining. Deburring is more than just cosmetic: it’s a critical quality step. Burrs can cause safety hazards, interfere with assembly, and reduce the fit and function of parts. Removing burrs ensures parts meet design tolerances and are safe to handle and use.

What Is Deburring?
Deburring literally means removing burrs. A burr is any raised edge or small bit of material that remains attached to a workpiece after cutting or forming. These burrs are inevitable byproducts of machining processes like milling, drilling, laser cutting, or stamping. As metal or plastic is sheared, the cut surface can become rough or ragged. For example, when the cutting tool exits the material, it may “roll” the edge over, creating a rollover burr. Similarly, Poisson burrs form when material bulges outward under pressure. If the tool tears through material irregularly, a tear burr is left. And a cutoff (breakout) burr appears if the material fractures prematurely as it is cut.
Deburring removes these imperfect edges to make the part function and look as intended. It is crucial because burrs can cause problems if left in place. Sharp burrs can injure workers during handling, and they can snag or interfere with mating parts. Even small burrs can prevent precise assembly or seating of components. For instance, Arcos notes that proper deburring leads to “better fit between components” and “increased safety for operators,” while skipping deburring can result in rework, downtime, or failure. In short, deburring ensures that parts fit together correctly, operate smoothly, and meet quality requirements.
Why Deburring Matters in Manufacturing
Deburring is a key quality control step. Removing burrs offers several important benefits for manufactured parts:
- Enhanced Safety: Sharp burrs are a hazard. Deburring eliminates the risk of cuts or punctures to operators or end-users. For example, ARKU emphasizes that “removing sharp edges…protects against injury”. By eliminating burrs, parts become safer to handle.
- Improved Assembly and Function: Burrs can prevent parts from fitting together as designed. Even tiny burrs can throw off alignment or block sliding parts. As one guide notes, deburring “ensures parts fit together properly”. Arcos similarly points out that deburring leads to a “better fit between components”, reducing the chance of assembly issues or mechanical failures caused by interference.
- Better Surface Quality: Deburred parts have cleaner, smoother edges. Removing burrs improves the surface finish and appearance of the part. Aesthetically, deburring eliminates unsightly protrusions that would otherwise make a part look unfinished. Functionally, a clean edge can also reduce friction or stress concentrations.
- Longer Part Life and Reliability: Burrs left on a part can act like stress risers, leading to premature wear, cracking, or corrosion. By contrast, deburred parts have edges that are often less prone to corrosion and fatigue. Arcos notes that deburring leads to “reduced wear and corrosion” and “lower risk of malfunction”. Proper edge treatment helps the finished product perform reliably over time.
- Efficiency of Downstream Processes: Parts that have been deburred process more smoothly through downstream operations (coating, welding, assembly, etc.). For instance, as ARKU explains, deburred edges optimize processes like welding or coating and reduce the burden on subsequent finishing steps.
Skipping deburring can be costly. A small burr might seem insignificant, but it can jam machinery, cause dimensional errors, or require parts to be scrapped. In safety-critical fields like medical or aerospace, even tiny burrs can cause catastrophic failures. In all these cases, manufacturers treat deburring as essential, not optional, for ensuring product quality and safety.
Figure: Common burr formations. A rollover burr forms when the cutting tool exits the workpiece, bending material over the edge; a tear burr results when material tears irregularly. Deburring removes these imperfections to leave a clean edge.
Common Burr Types on Metal and Plastic Parts
Different machining processes produce different burr shapes. Understanding burr types helps select the right removal method:
- Roll-Over Burr (Exit Burr): The most common burr. It forms at the exit side of a cut or drill. As the tool leaves the material, it tends to push and fold material over the edge, creating a small rounded flap or ridge. Roll-over burrs affect how parts fit and can require extra sanding or filing to smooth.
- Tear Burr: Occurs when the tool does not completely sever the material and a rough “tear” edge is created. In this case, rather than cutting cleanly, the workpiece material fractures unevenly, leaving a jagged, torn edge. Tear burrs can be especially sharp and irregular.
- Poisson Burr: Forms when the material bulges due to compressive forces. If enough material accumulates ahead of or behind the cutting tool, it can “pile up” at the edge. Poisson burrs typically appear on the underside or exit edge of a hole or slot and look like a thin raised ridge.
- Cut-Off (Breakout) Burr: Occurs when material is removed before the cut is fully completed. For example, if a milling operation is abruptly stopped, the unfinished section can separate and leave a burr at the cutoff point. This burr tends to be small but can be rough.
These burrs can occur on both metal and plastic parts. Plastic machining burrs often look similar but may be easier to remove. In 3D-printed or injection-molded plastic, any excess flash or edges are also considered burrs. In practice, manufacturers inspect parts and identify burrs (by feel or microscope) and then plan their removal strategy based on burr type and location.
Deburring Tools and Their Main Uses
There is a wide variety of deburring tools, each suited to certain materials or burr shapes. Generally, tools fall into two categories:
- Manual Deburring Tools: Handheld tools that an operator uses directly on the part.
- Power/Automatic Tools: Electrically or pneumatically driven tools and machines that remove burrs mechanically, chemically, or thermally.
Manual Deburring Tools: These are simple, low-cost tools operated by hand. Common examples include hand files, scrapers, stones, and knives.
- Hand Files: Flat, round, or triangular metal files can grind down burrs on edges and holes. Files come in different cuts (coarse, fine) for rough removal or finishing.
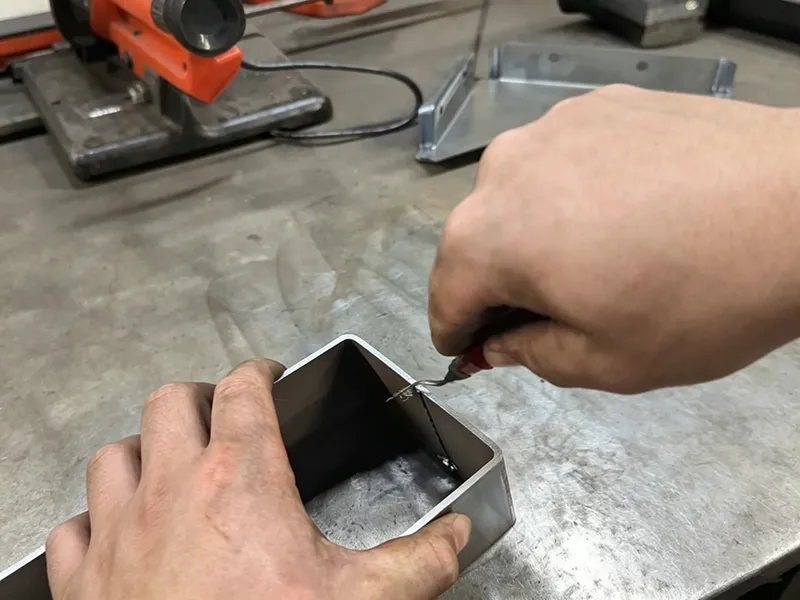
- Deburring Knives/Scrapers: Special blades designed for deburring (often with a hooked or straight edge). A swivel-blade deburring tool can remove burrs from drilled pipes or holes.
- Abrasive Stones and Sanding Tools: Abrasive blocks, emery stones, or sandpaper provide manual abrasive deburring. They are useful on flat surfaces or to fine-tune an edge.
- Countersink Deburrers: Handheld countersink bits or cone-shaped tools are used to chamfer or deburr the inside of drilled holes and pipe ends. These are especially handy for removing burrs from within a hole or tube.
Manual tools are flexible and easy to use on a variety of materials. For example, safety scrapers with carbide or ceramic tips can slice away burrs on both metal and plastic edges. The slice.com guide notes that advanced ceramic blades are often the best choice for deburring plastics, since ceramic is harder than metal and won’t wear down when cutting plastic. In contrast, metal-deburring blades are typically high-speed steel or carbon steel.
Power Deburring Tools: These include both portable power tools and automated machines. They dramatically speed up deburring, especially on large or high-volume jobs. Examples:
- Rotary Tools and Grinders: Handheld die grinders, Dremel-type rotary tools, or angle grinders fitted with abrasive bits (carbide burrs, wheels, or flap discs) remove burrs quickly on metal parts. They require care (and PPE) because they are aggressive.
- Brush Deburring Machines: Motorized rotating brushes or wire wheels that sweep the surface. These remove burrs gently and are used for softer burrs or finishing. Rotating nylon or abrasive brushes can reach into holes and crevices.
- Abrasive Tumblers and Vibratory Machines: Parts are tumbled with abrasive media (small stones or ceramic pieces) in a vibrating bowl. Over time, the media knocks off burrs from all surfaces. This is excellent for batch processing many small parts to get uniform finishes.
- Thermal Deburring (TEM): A specialized industrial process that exposes parts (placed in a sealed chamber) to a combustible gas mixture. A controlled detonation vaporizes the burrs without harming the underlying metal. This works on metals like steel or aluminum but requires specialized equipment.
- Electrochemical Deburring (ECD): The part is made the anode in an electrolytic cell, and a shaped cathode is used near the burr. An electrical current causes the metal burr to dissolve in the electrolyte. ECD is precise and good for complex geometries where mechanical tools can’t reach.
- Robotic Deburring Systems: Robots equipped with grippers, brushes, or tools automate burr removal. With the right end-effector, a robot can consistently deburr complex parts, improving repeatability and throughput.
Material-Specific Tools: Some tools are more suited to certain materials. For example, steel and stainless parts often require robust tools (e.g. carbide burrs, rigid brushes) because these materials are tough. In contrast, aluminum is softer but prone to smearing; deburring often uses softer abrasives (like aluminum-oxide brushes) to avoid scratching. For plastic parts, specialized ceramic scrapers and abrasive blocks are common.
Overall, the choice of deburring tool depends on the part material, burr size and hardness, part geometry, and production needs. The right tool will remove the burr efficiently without damaging the part material.
How to Choose the Right Deburring Tool
Selecting the correct tool or method is critical. Consider these factors:
- Material Type: Hard materials like stainless steel require stronger, more durable tools (for example, ceramic-grit nylon brushes or carbide burs). Softer materials like aluminum or plastic need tools that will not chip or gum up (fine abrasives or ceramic blades). Unionfab advises that tool choice should start with the part’s material and the type of burr encountered.
- Part Geometry: The shape of the part and the location of burrs matters. Narrow passages or deep holes may require long, slender tools (deburring picks or flexible blades) to reach inside. Complex contours may benefit from rotary tools or small abrasive brushes. Flat edges are easily filed or sanded, while round holes may need a countersink deburrer. Analyze the component to see where burrs will be and choose a tool that can access those areas.
- Burr Size and Quantity: Large, heavy burrs (common on thick cuts) need more aggressive removal. For example, a coarse file or a power grinder can remove a heavy burr quickly, whereas thin flash (like on a 3D print) might only need a fine abrasive or a light brush. The necessary smoothness of the final edge also guides tool selection.
- Production Volume: For one-off or low-volume parts, manual deburring (files, knives, hand-held grinders) is usually sufficient. For high-volume production, automated methods pay off. A tumbler or vibratory machine can process hundreds of small parts at once. For very high volumes or very precise needs, robotic or specialized machines (TEM/ECD) may be justified. As Unionfab notes, manual tools are best for small jobs and complex shapes, while automatic tools are preferred for mass production.
- Required Finish and Tolerance: If the part has tight tolerances, choose a gentle method that won’t remove too much material. Conversely, if a rough edge is acceptable, faster, coarser tools can be used. Consider downstream needs: if the edge will be coated or plated, a smooth base may be necessary.
In practice, experienced fabricators will often use a combination: a quick mechanical pass (grinding or tumbling) followed by manual touch-up in critical areas. The key is matching the tool to the task: proper selection saves time and prevents damage to the part.
Manual Deburring Tool Options
Manual tools are the most basic deburring solution. Common hand tools include:
- Hand Files: Metal files in various shapes (flat, round, half-round, triangular) are used to grind down edges. Coarse files remove material quickly, while fine files produce a smoother finish. Files are versatile and can be used on all types of metal and plastic.
- Scraping Blades (Hand Deburring Tools): These handheld tools have sharp carbide or steel blades designed for edge deburring. Examples include handheld deburring knives and swivel deburring tools. A safety scraper with a replaceable blade is effective on long straight cuts or gentle curves. The blade is drawn along the edge to shave off the burr.
- Abrasive Stones and Sanding Blocks: Abrasive stones (like aluminum oxide blocks) or sanding blocks allow for manual sanding of edges. They work on both metal and plastic. You simply rub the abrasive against the burr to wear it away. Finer grits are used for finishing.
- Countersink Deburring Tools: These are cone-shaped bits (like a mini-countersink drill bit) mounted on a handle. They are ideal for deburring the inside of drilled holes, tubes, and pipes. By inserting the countersink and spinning it manually, the burr at the hole’s edge is removed. These tools can quickly clean up circular holes in metal or plastic.
Each manual tool has its place. For instance, a machinist might use a file to flatten a large burr, then finish with an abrasive stone. Plastic parts often use ceramic-edged scrapers because plastic can stick to metal blades. In general, manual tools require skill and are labor-intensive, but they offer great control for small or delicate parts.
Automatic Deburring Tools for Industrial Production
In industrial settings, automated deburring tools and machines handle large quantities efficiently:
- Vibratory/Tumbling Machines: Parts are loaded into a vibrating bowl or barrel along with abrasive media (ceramic, plastic, or steel media). The vibration causes the parts and media to gently rub together, removing burrs on all surfaces. This is a batch process ideal for many identical small parts. It’s low-labor and provides consistent results.
- Brush Deburring Machines: These use rotating brushes made of wire or abrasive filament. Machines can spin the brushes while holding the part, brushing off burrs. As Empire Abrasives notes, brushing involves “rotating brushes or bristled tools that sweep across the surface to remove burrs”. Brush machines are good for complex shapes and can be adjusted (speed, pressure) for different materials.
- Thermal Deburring (TEM): Parts are placed in a chamber and a fuel gas/oxygen mixture is ignited. The resulting brief explosion raises the temperature extremely high (several thousand °F) and quickly vaporizes burrs and flash. Because the explosion is so short, the heat does not damage the part. TEM is common in aerospace and automotive where many machined metal parts need burr-free edges.
- Electrochemical Deburring (ECD): A special tool made of conductive shape is placed close to the burr and an electrolyte solution flows between them. When electrical current is applied, the burr (anodic metal) is dissolved and removed. ECD works well for intricate or internal burrs that physical tools can’t reach. It is precise and leaves a clean finish without mechanical stress.
- Robotic Deburring Systems: Industrial robots equipped with a spindle, brushes, or pick-and-place tools can remove burrs from complex parts. A robot can follow programmed paths to deburr along edges consistently. Modern factories use robots especially for high-mix or high-volume production, integrating deburring as one step in an automated assembly line.
These automated methods reduce labor and improve consistency. As Arcos notes, automated and robotic deburring allows integration into production with repeatability and precision. However, they require capital investment and setup. Companies choose them when throughput or critical tolerances justify the cost.
Deburring Methods Explained
There are several broad methods of deburring. Each is suited to different applications:
- Manual Deburring: As discussed, this uses hand tools (files, scrapers, stones) to physically scrape or grind off burrs. It’s labor-intensive but simple and flexible. Manual deburring is best for small batches, prototypes, or hard-to-reach areas on complex parts.
- Mechanical Deburring: This encompasses techniques where mechanical energy and abrasives remove burrs. Examples include grinding and milling (using rotating abrasive wheels or mills to cut away burrs), brushing (rotating wire or nylon brushes), and vibratory/tumbling finishing. Mechanical methods are faster than manual deburring and suitable for medium to large volumes.
- Thermal Deburring: Also called the Thermal Energy Method (TEM), this uses a controlled gas explosion to burn off burrs. No physical contact is needed. TEM is extremely fast for small features but requires safety measures due to the explosive process.
- Chemical Deburring (Etching): In this less-common method, parts are dipped in a chemical bath that etches away a very thin layer of material, including burrs. It’s like a mild acid etch. Chemical deburring can uniformly remove burrs on many parts at once, but it can also remove more base metal and requires corrosion cleanup. It’s used occasionally for large runs of simple parts or delicate features.
- Electrochemical Deburring: Detailed above, ECD dissolves the burr using electrolysis. It is a hybrid of chemical and electrical methods, useful for precision parts. No mechanical force is applied to the part, so geometry is preserved.
Each method has pros and cons. Manual deburring is cheap but slow. Mechanical (grinding, brushing) is fast but can’t reach hidden burrs. Thermal and ECD can reach internal burrs but only work on conductive metals and need special equipment. Often, manufacturers combine methods (e.g., machine deburr + manual touch-up) to ensure all burrs are removed efficiently.
Step-by-Step Deburring Process
A typical deburring workflow involves several steps to ensure quality:
- Inspect the Part: Carefully examine edges and surfaces for burrs. Use good lighting and, if needed, magnification. Identify all burr locations. As Unionfab suggests, “Inspect for burrs – examine edges and surfaces…to find all burrs”.
- Prepare the Part: Secure the part in a vice or fixture if using power tools, or use gloves to hold it during manual deburring. Removing any dirt or oil first helps; a clean part shows burrs more clearly.
- Select the Deburring Method: Choose tools and methods based on the factors above (material, geometry, etc.). Use coarse removal tools first, then switch to finer tools for smoothing. For example, start with an angle grinder for heavy burrs, then finish with a hand file for precision.
- Remove the Burr: Systematically apply the chosen tool to each burr. For hand deburring, brush or file in long, even strokes along the edge. For machines, run the part through the machine carefully. Always remove material gradually; it’s safer to make multiple light passes than to dig in too hard at once.
- Check Edge Quality: After deburring, inspect the edge. It should be smooth and free of sharp projections. Use visual inspection and feel with a fingertip (wearing a cloth or glove). You might use a gauge or microscope for fine parts. If any burrs remain, deburr again as needed.
- Clean the Part: Remove any abrasive grit or debris left by the deburring process. A clean, dry cloth or compressed air can be used. Ensuring the part is clean prevents contamination in later processes (like painting or plating).
- Final Inspection: Confirm that all edges meet specification (dimensionally and finish-wise). For high-reliability parts, document the inspection. Unionfab emphasizes ending with a final clean and inspection per quality standards.
Following these steps systematically ensures burrs are fully removed without damaging the part.
Deburring Tools for Different Materials
Steel: Steel parts often require aggressive tools because steel is hard. Common choices are carbide burrs or heavy-duty abrasive brushes. For carbon steel and mild steel, silicon-carbide or alumina flap discs on grinders, or carbide rotary burrs, work well. For stainless steel (which work-hardens), abrasive nylon brushes with ceramic or silicon-carbide grit are effective. The Shanghai Longguang guide notes that stainless steel needs “high-density abrasive brushes (ceramic or silicon carbide grit)” to cut the burr rather than just bend it. Always use tools rated for stainless to avoid overheating or work-hardening the surface.
Aluminum: Aluminum is softer but can be gummy. Use fine abrasives such as aluminum-oxide stones or brushes. The same Shanghai guide advises fine-grit aluminum oxide brushes for aluminum, because these are less aggressive and less likely to scratch the surface. Keep the tool clean, as aluminum dust can clog abrasives. Always ensure lubrication or air to flush debris when deburring aluminum to avoid loading the brush or cloth.
Stainless Steel: Like carbon steel, stainless steel requires strong abrasives. As above, ceramic-impregnated nylon brushes and carbide burrs are ideal. Stainless work-hardens, so use moderate speeds and let cooling happen. If the burr is very tough, an electrochemical method or chemical etch may be considered instead of purely mechanical.
Plastic Parts: Soft plastics need gentler deburring. According to Slice, ceramic blades are best for plastic because they remain sharp against softer material. Straight metal blades can melt or chatter. Common tools include plastic-safe scrapers, fine files, and sandpaper. A small rubber-backed abrasive wheel or fine-grit sanding stick can smooth plastic edges. For intricate plastic shapes, a sharp hobby knife or triangular file works. Avoid melting: no high-speed grinding on plastic unless it’s cooled or prepared for that.
In summary, match the tool hardness and shape to the material: hard tools for hard materials, softer abrasives for soft materials. This prevents damage (scratching or burning) while efficiently removing burrs.
Deburring Tool Safety and Best Practices
Working with burrs and deburring tools requires safety precautions and good technique:
- Wear Proper PPE: Always wear safety glasses or a face shield to protect against flying chips or dust. Gloves can protect fingers from sharp edges, but be careful that gloves don’t get caught in spinning tools. Hearing protection is needed when using noisy grinders. Good lighting helps spot tiny burrs.
- Secure the Part: Clamp or support the workpiece firmly. Never hold the piece in one hand while deburring it with the other on power tools. A loose part can spin or shoot out, causing injury.
- Use Correct Tool Speed/Pressure: Run power tools at recommended speeds. Do not force the tool: let the abrasive cut. Excessive pressure can cause the workpiece to gouge or the tool to kick back. For example, Shanghai Longguang advises using slower RPM with higher torque when brushing stainless steel to keep the abrasive cutting effectively.
- Avoid Over-Deburring: Remove only as much material as necessary. Excessive deburring can damage the part or push it out of tolerance. ARKU stresses that unnecessary edge rounding wastes cutting performance (doubling radius quadruples abrasive cost). Focus on removing the burr, not creating a new edge profile.
- Maintain Consistent Edges: Aim for a uniform edge radius or chamfer across similar edges. Consistency ensures that parts fit together predictably. If an edge must be chamfered to a specific angle or radius, measure and check as you deburr.
- Inspect for Hidden Burrs: After each deburring step, re-inspect the part thoroughly. It’s easy to miss small burrs, especially on the underside of holes or inside corners. A final inspection step ensures no burrs remain before the part moves on.
- Maintain and Replace Tools: Keep deburring tools in good condition. Dull files and blades remove material slowly and can slip. For example, replace scraping blades when they get nicked. Clean brushes of metal filings. A well-maintained tool provides safer, more predictable results.
- Prevent Burr Formation: Finally, remember that “what is not created does not need to be removed.” ARKU advises fabricators to optimize cutting processes to minimize burrs in the first place. Proper cutting speeds, sharp tools, and correct machine settings reduce burr size and make deburring easier.
By following these practices—using PPE, securing workpieces, and choosing the right speed and pressure—you keep operations safe. Avoid rushing so you do not over-cut or leave hidden burrs. In essence, approach deburring deliberately and inspect continuously.
Common Deburring Mistakes to Avoid
Even experienced operators can slip up. Common errors include:
- Using the Wrong Tool: For example, using a soft brush on hardened steel burrs (ineffective) or using an overly aggressive grinder on plastic (melts the part). Always pick a tool matched to material and burr type.
- Over-Deburring: Removing too much material or rounding an edge more than specified. This wastes time and may ruin part dimensions or necessitate rework.
- Neglecting Hard-to-Reach Areas: It’s easy to deburr visible edges and miss burrs inside holes or corners. Use lights and mirrors as needed. If a burr is left in a corner, it can cause a fit failure or even fall into a mechanism later.
- Skipping Final Inspection: Always check the deburred part under good light and feel for smoothness. Some burrs are tiny and subtle—skipping the final check can let a flaw through.
Avoid these mistakes by planning your deburring steps, using appropriate tools, and verifying the result thoroughly.
Deburring Tools vs. Other Finishing Methods
Deburring is often confused with other edge-finishing techniques, but it serves a distinct purpose:
- Deburring vs. Polishing: Polishing or buffing refines a surface’s finish and shine using abrasives or cloth wheels. It’s focused on smoothness and appearance, not removing material from edges. While polishing might slightly round an edge, it is not designed to remove significant burrs. Deburring specifically removes raised imperfections; polishing is a separate fine-finishing step that may follow deburring.
- Deburring vs. Chamfering: Chamfering intentionally cuts a beveled edge at a specified angle or radius on a part’s edge. It is a design feature done by tooling to the specification. Deburring, on the other hand, removes unintended burrs. James Engineering explains that deburring machines remove burrs and imperfections, whereas chamfering machines “focus on creating precise bevels”. In practice, you might chamfer an edge to eliminate stress or create a lead-in, but any burr from that cut would still need deburring.
- Deburring vs. Grinding: Grinding (with bench grinders or belt sanders) can remove burrs and shape edges but is generally more aggressive and less controlled. A grinder removes stock quickly and can change edge geometry. Deburring aims to leave the part’s dimensions essentially intact, taking off only the unwanted burr. Grinding is a type of mechanical deburring when used carefully, but deburring often uses gentler methods (like brush or light filing) to avoid altering the part beyond the burr.
In summary, deburring is about defect removal, while polishing and chamfering are about improving finish or adding intentional geometry. A complete manufacturing workflow might include all these steps: chamfer for strength/aesthetics, then deburr for safety/fit, then polish for appearance.
Industries That Commonly Use Deburring Tools

Deburring is a universal manufacturing process used across many industries. Notable examples include:
- CNC Machining: Virtually any machined metal or plastic component will require deburring after milling, turning, or drilling. Machine shops deburr parts for automotive, aerospace, electronics, and general industrial use.
- Sheet Metal Fabrication: Laser-cut or stamped sheet metal always has sharp edges. Fabricators use deburring methods (often automated brush or grit-blast machines) to clean up blanks and parts for enclosures, panels, brackets, and more.
- Automotive Industry: Car and truck parts – chassis components, engine parts, fasteners – are machined or cast and then deburred. As noted, deburring is critical so that metal parts fit and move correctly. The automotive sector’s emphasis on safety and longevity makes deburring essential.
- Aerospace and Defense: Aircraft and spacecraft have extremely stringent quality standards. Every component (gears, frames, fasteners, ducts) must be burr-free to ensure reliability at high speeds and pressures. Deburring here often uses advanced methods like robotic or thermal deburring.
- Medical Devices: Medical instruments and implants (surgical tools, bone plates, implants) require perfect surfaces to avoid tissue damage or bacterial traps. Deburring of stainless steel or titanium parts is routine. Any burr on a medical device could have serious consequences.
- Electronics: Enclosures, connectors, and metal chassis parts in electronics are deburred so that assemblies fit precisely and wires aren’t cut by sharp edges.
- General Manufacturing: Other areas like furniture hardware, consumer appliances, construction components, and agricultural machinery also rely on deburred parts for durability and safety.
In short, if a part is cut or machined, it likely needs deburring before it goes into service. Industries that demand high-quality finishes or precise fits include aerospace, automotive, medical, electronics, and metal fabrication among others.
Summary
Deburring is a vital finishing step in manufacturing. Its core function is to remove the small, unintended imperfections left on edges after cutting or forming. By removing burrs, manufacturers ensure parts are safe to handle, fit and function as intended, and have clean surface quality.
Choosing the right deburring tool or method depends on the material of the part, the geometry and size of the burr, and production requirements. Hand tools like files and scrapers offer precision for small jobs, while power tools and machines (vibratory finishers, brush machines, thermal/ECD systems) handle larger volumes efficiently. Different processes—manual, mechanical, thermal, or chemical—apply based on the scenario.
In practice, a manufacturing process may involve a mix of deburring techniques. For example, a fabricator might grind large burrs away, tumble the parts in an abrasive media, and then manually inspect and touch up any remaining burrs with a hand file. This layered approach maximizes quality and efficiency.
Above all, deburring impacts quality and productivity. Well-deburred parts minimize scrap and rework. They perform better in assembly and use. As ARKU notes, “deburred parts are a sign of quality” that help companies stay competitive.
If you have further questions or need assistance with deburring solutions, feel free to contact us at [email protected].
FAQ
- What is the best deburring tool for metal parts?
There is no one-size-fits-all. For steel and other hard metals, high-speed steel or carbide files, burr bits, and abrasive wheels are common. For small burrs, a handheld carbide scraper or file might be best. For large burrs, a bench grinder or automated tumbler may be more efficient. Always match the tool’s aggressiveness to the metal’s hardness. - What is the difference between manual and automatic deburring tools?
Manual deburring tools are hand-operated (files, scrapers, hand-held grinders). They are simple and flexible, ideal for small quantities or hard-to-reach areas. Automatic tools are machine-driven (rotary tumblers, brush machines, laser/thermal deburring machines) and can process many parts quickly with less labor. Automated tools require setup but excel at high volume and consistency. - Why is deburring important after machining?
Deburring improves safety, quality, and function. It removes sharp edges that could injure workers or cause cuts in final products. It also ensures parts fit together properly and meet specifications. Leaving burrs can lead to assembly problems, accelerated wear, or unexpected failures. - Can deburring tools be used on plastic parts?
Yes, but tools must be chosen carefully. Plastic is softer and can melt or chip. Typically, plastic deburring uses ceramic or carbide blades and fine abrasives. Hand files and scrapers work well on large plastic surfaces. Some plastics benefit from cryogenic deburring (freezing then lightly sanding). Avoid very high-speed grinding on plastic without cooling, as it can burn the material. - What is the fastest deburring process for mass production?
For very high volumes, batch processes like vibratory tumbling or barrel finishing are among the fastest. Thousands of parts can be deburred simultaneously in a tumbler with abrasive media. Another quick method is thermal deburring (TEM), which removes burrs from all surfaces in one rapid step. The choice depends on part material and geometry, but vibratory finishing and thermal deburring are known for speed. - How do you choose the right deburring tool?
Consider the part material (hard vs. soft), the shape and location of the burrs, the size of the burr, and production volume. For example, ceramic brushes might be chosen for tough stainless steel burrs, whereas a fine sanding block could be used for a plastic edge. For large metal burrs, a power grinder is better than a small hand file. Always pick a tool that will reach the burr and remove it without damaging the part.